You can customize an AI feature or an AI-based product with Scade and integrate it into your own application via API [Unified API] or create a solution using Shopify. In this tutorial, we’ll show you how to deploy any solution configured in Scade for end-users. We’ll be setting up both POST and GET requests to interact with your flow. Let’s get started!
Step 1: Getting Your API Server Key
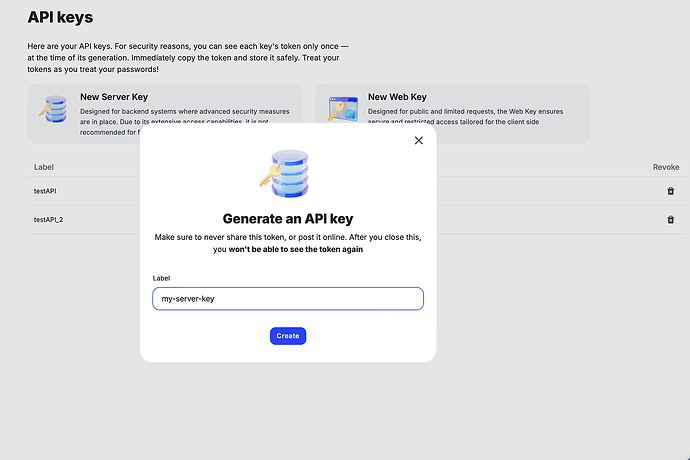
To start, we’ll need to generate an API server key, which will allow authentication with the Scade API:
-
Go to the Scade main page.
-
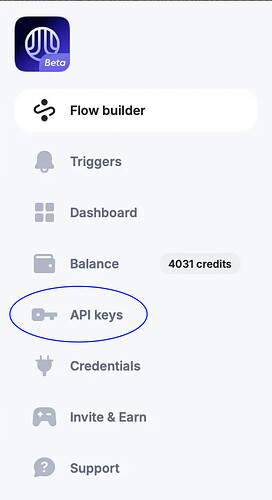
Navigate to API Keys in the left menu.
-
Click on New Server Key and name it (e.g., “My Server Key”).
-
Once the token is generated, store it safely, as it won’t be accessible again.
Step 2: Publishing and Preparing the Flow
Next, we’ll prepare the flow you want to connect:
-
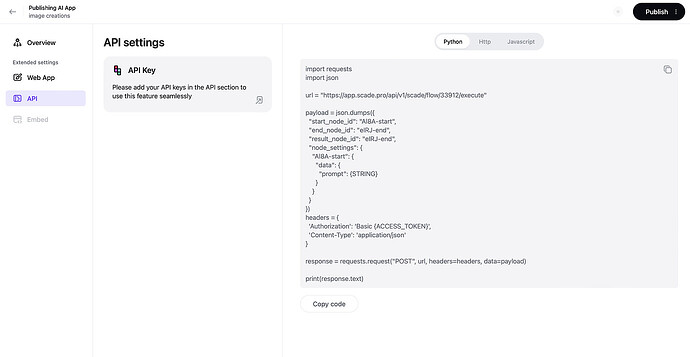
Navigate to your flow and click Publish (top-right corner).
-
Select API to see code examples for making POST requests in various languages, including Python, HTTP, and JavaScript.
Step 3: Review the API Documentation
Before setting up, review the API documentation:
- Click Knowledge Base (bottom-left corner) to access the documentation. API Documentation
- The documentation will guide you through making the initial POST call to execute the flow, followed by a GET request to retrieve the results.
Step 4: Connecting Scade API to Shopify with image generation flow
The guide is primarily based on information from sources [6] and [7], with some additional context from [5].
Please make sure to read the documents carefully on your own and don’t rely solely on the guide.
-
Create a Custom Shopify App
- Log in to your Shopify admin panel.
- Navigate to Apps > Develop Apps.
- Click Create an app.
- Name your app (e.g., “External Service Integration”).
- Go to API credentials and configure the necessary API scopes (e.g., read_products, write_products).
- Save your API key and secret key for later.
-
Set Up Your Development Environment
- Set up a Node.js project with your preferred framework (e.g., Express).
- Initialize a new Git repository.
- Create a .gitignore file to exclude sensitive information like API keys.
-
Install Necessary Dependencies
For a Node.js project, run the following commands to install essential packages:
npm init -y
npm install axios shopify-api-node express dotenv node-fetch
- Set Up Environment Variables
Create a .env file in your project root with the following keys:
SHOPIFY_SHOP_NAME=your-shop-name
SHOPIFY_API_KEY=your-api-key
SHOPIFY_API_SECRET=your-api-secret
SCADE_ACCESS_TOKEN=your-scade-access-token
- Create the Main Application File
In app.js, set up your basic server and routes:
require('dotenv').config();
const express = require('express');
const fetch = require('node-fetch');
const Shopify = require('shopify-api-node');

const app = express();
const port = 3000;

const shopify = new Shopify({
  shopName: process.env.SHOPIFY_SHOP_NAME,
  apiKey: process.env.SHOPIFY_API_KEY,
  password: process.env.SHOPIFY_API_SECRET
});

app.use(express.json());

app.listen(port, () => {
  console.log(`Server running at http://localhost:${port}`);
});
- Implement Integration Logic
This is the example of GET call answer
Please note that line 21 displays the name of the end node input you created in your flow.
{
    "id": 2317569,
    "data": {
        "node_id": null,
        "start_node_id": "Al8A-start",
        "end_node_id": "eIRJ-end",
        "result_node_id": "eIRJ-end",
        "init_context": {},
        "node_settings": {
            "Al8A-start": {
                "data": {
                    "prompt": "witch"
                }
            }
        }
    },
    "status": 3,
    "created": "2024-10-17T10:39:47.868836",
    "finished": "2024-10-17T10:40:03.367300",
    "result": {
        "Result": "https://scade-uploads.s3.eu-central-1.amazonaws.com/uploaded-images/2024-10-17/d9cd723b3bf4867088127356d98c095efa77d956c1f0ada2395a1f3db610/R8_SD3_00001_.webp",
        "inputs": null,
        "data": null,
        "success": {
            "Result": "https://scade-uploads.s3.eu-central-1.amazonaws.com/uploaded-images/2024-10-17/d9cd723b3bf4867088127356d98c095efa77d956c1f0ada2395a1f3db610/R8_SD3_00001_.webp",
            "inputs": null,
            "data": null
        }
    },
    "execution_time": 13901,
    "execution_cost": 5.250145499850001,
    "parent_id": null,
    "ref_id": "flow:33912;",
    "task_type": 4,
    "is_hide": false,
    "public_access_token": null,
    "file_result_link": null
}
To execute the AI-generated image workflow, add the following functions to your app.js:
async function startJob(prompt) {
  const headers = {
    "Authorization": `Basic ${process.env.SCADE_ACCESS_TOKEN}`,
    "Content-Type": "application/json"
  };

  const body = JSON.stringify({
    "start_node_id": "Al8A-start",
    "end_node_id": "eIRJ-end",
    "node_settings": {
      "Al8A-start": {
        "data": {
          "prompt": prompt
        }
      }
    }
  });

  const response = await fetch("https://app.scade.pro/api/v1/scade/flow/33912/execute", {
    method: 'POST',
    headers,
    body
  });

  const result = await response.json();
  return result.id;
}

async function checkJobStatus(taskId) {
  const headers = {
    "Authorization": `Basic ${process.env.SCADE_ACCESS_TOKEN}`
  };

  const response = await fetch(`https://api.scade.pro/api/v1/task/${taskId}`, {
    method: 'GET',
    headers
  });

  return await response.json();
}

async function updateShopify(imageUrl) {
  const product = await shopify.product.create({
    title: 'AI-generated product',
    images: [{ src: imageUrl }]
  });
  return product.id;
}

async function processJob(taskId) {
  let jobComplete = false;
  while (!jobComplete) {
    const status = await checkJobStatus(taskId);
    if (status.status === 3) {
      jobComplete = true;
      const imageUrl = status.result.Result;
      await updateShopify(imageUrl);
      return { imageUrl };
    }
    await new Promise(resolve => setTimeout(resolve, 5000));
  }
}
- Create API Endpoints
Set up an endpoint to trigger the image generation:
Add this route to yourapp.js:
app.post('/generate-image', async (req, res) => {
  const { prompt } = req.body;
  const taskId = await startJob(prompt);
  res.json({ message: 'Job started', taskId });

  processJob(taskId).catch(console.error);
});
Final Steps: Testing, Deploying, and Monitoring
1. Test: Run your server and use Postman to send a POST request to http://localhost:3000/generate-image.
2. Deploy: Choose a hosting provider (e.g., Heroku, AWS) and deploy your app.
3. Monitor: Set up logs and monitoring to track the integration’s health.
By following these steps, you’ll successfully connect ScadePRO’s AI capabilities with Shopify, enabling dynamic product updates using AI-generated content.
Here’s a breakdown of the key contributions from each source:
[6] “Building a RESTful API with Node.js: A Step-by-Step Guide” provided the overall structure for the guide, including:
-
Initializing a new Node.js project
-
Installing required dependencies
-
Creating the server
-
Defining API routes
-
Integrating API routes into the server
[7] “Step-by-Step Guide to Creating a REST API in Node.js - Apidog” contributed:
-
The real-world REST API example for a library
-
The example of creating an Express app
-
The example of adding more routes for a “To-Do List” API
[5] “Integrating With Node.js REST APIs | Moesif Docs” provided additional context on working with Node.js REST APIs, though it wasn’t directly used in the step-by-step instructions.
This guide combines and adapts information from these sources to create a comprehensive tutorial on building a RESTful API with Node.js and Express.
Citations:
[1] Shopify API, libraries, and tools
[2] 7 Tips to Maximize Your Use of The Shopify API - Shopify
[3] https://www.youtube.com/watch?v=muhtIHD5vCo
[4] Comprehensive Guide to Third-Party API Integration in Shopify Application Development
[5] Integrating With Node.js REST APIs | Moesif Docs
[6] Building a RESTful API with Node.js: A Step-by-Step Guide - DEV Community
[7] Step-by-Step Guide to Creating a REST API in Node.js
Feel free to ask your questions and share insights about implementing Scade Flow into Shopify in this thread.


